Well, I finally decided to try merging my software skills with my new toy to try to recreate an out-of-production rocket, the 37 inch tall Estes Maxi Brute Honest John (available 1975-1983; on page 31 of the Estes catalog at https://cdn.shopify.com/s/files/1/0686/0220/0369/files/Estes_1975_Catalog.pdf). The nose cone is unique and no longer available, so I decided to try to take advantage of a new feature in OpenRocket version 23.09 that allows the export of parts of a rocket as an .OBJ file, suitable for 3D printing. The OpenRocket team put together a great tutorial describing the process. Luckily for me, someone posted a RockSim file for the Maxi Brute Honest John on RocketReviews.com in 2010, and OpenRocket supports the import of RockSim .rkt files so I thought I'd give it a try.

OpenRocket displays the nose cone in two parts, a cone and a "transition" that inserts into the body tube. Selecting each part in the OpenRocket design then choosing File/ExportAs allows me to save each part as an .OBJ file. Similarly, I was able to select the fins with the fin can part of the body and export that as one unit. The .OBJ files can be opened (on my Mac) using Preview, which allows me to turn around the object to see what it will look like in 3D:
Once I had the parts exported, the next step was to prepare them for 3D printing by opening them in UltiMaker Cura the 3D slicing software I use with my printer. This generated a .gcode file, which is a long text file with instructions for the printer:
Loading this onto the printer I started a 21 hour print job (using white PLA, 0.2 mm wide print, 100% infill, with tree supports from the base). The finished print was 6 inches tall and about 11 inches across.
The conical shapes at the bottom are the supports, which snip off easily leaving the finished fin can. I also mocked up individual fins as .OBJ files with half inch fin tabs in case I needed to attach individual fins to the body by cutting slits in the body tube.
When I test fit an Estes BT-80 body tube (as specified in the RockSim rocket design) it fit perfectly! I decided to 3D print three engine mounts to hold a 29 mm engine tube, and am currently printing the ~18 inch nose cone (in two parts). The job for the 12 inch nose cone and the transition is projected by UltiMaker Cura to take "1 day, 5 hours and 36 minutes" to print so I'll post a final picture when everything has been assembled.
I'll have to glue the two parts of the nose cone together with super glue and drill one of the engine mounts to allow me to
attach Kevlar and the shock cord and borrow a parachute from another rocket.
OpenRocket estimates this will fly 450 feet on an F15-6, but I'll update that after weighing the finished printed parts. I'll need to attach some launch lugs using balsa stand off attachments, glue on an
Estes 29 mm engine retainer, paint the rocket green and see how if flies! I'll post updates as I progress.
Note to self-I made a rookie mistake and tried to "pause" my 3D printing after the nose cone was ~3 1/2 inches tall so I wouldn't have the background noise during a conference call this morning. Unfortunately, when I restarted printing and let it run another half hour I realized there was a noticeable gap that looked like the new layer would separate from the rest of the object along a "dotted line". Maybe it got too cold waiting ~1 1/2 hours, preventing the new layer from properly fusing. I stopped the print, removed the incomplete objects, cleaned the print surface and started a new print job. I'll use these ~4 inch incompletely printed halves to practice gluing them together so I don't mess up the ~7 inch parts that will take another day to print.
Update: I sanded the surfaces with course sandpaper then brushed thin "Crazy" brand super glue across the entire surface of one object then held the halves together for a minute.
A couple of hours later I tried a drop test, dropping it on the side onto concrete from about five feet. The joint held, but it split along the “dotted line” defect as expected. I'll need to trim and sand the edges before gluing the final product. The nose cone and adapter are almost two thirds done printing, and you can see the notch forming on the transition piece to the left below that will connect the nose cone into the body of the rocket:
1/21 Update:
The 12 inch nose cone and transition finished printing last night (30 hour print job):
I trimmed the edges off each base used to hold the print to the bed and did a test fit of the 37 inch tall rocket:
I still need to weigh the individual parts and update the OpenRocket simulation, sand the parts, glue the engine mount, glue the body tube to the fins, glue together the two halves of the nose cone and figure out how to connect the nose cone to the body. I may print a small flat X shaped crossbar that I can glue inside the transition to attach the parachute and shock cord. Finally, I'll paint it olive drab and put some US Army decals on the body so it looks a bit like the version on
JimZ's rocket plans:
Jan 22nd update:
After letting the printer rest a day I explored ways to add a base cap to the nose cone transition that I could use to attach the parachute. I have only opened some of the recommended online 3D design tools a couple of times so was very cautious. After attempting to attach a hemisphere to the bottom of the transition, the file exported for printing looked corrupted so I decided to just try rendering a hemisphere by itself then gluing it to the bottom of the transition. Converting the Estes body tube inner dimensions (2.56 inches) to metric (65 mm) I dropped a hemisphere from the panel in
Tinkercad and resized it to 65 mm:
Exporting this as an .OBJ to my desktop then importing to UltiMaker Cura for slicing shows 1 hour 47 minutes of printing and 27 gm of weight for a disc that's 65 mm across and 10 mm high (~0.4 inches). I'll try sanding, drilling, feeding some Kevlar through then gluing to the bases of the transition.
Yesterday I weighed the 3D printed parts and compared them to the OpenRocket simulation. I'd selected PLA with 100% infill instead of the usual Estes plastic parts, so my simulation (without the base cap I just printed) was very close to what had been projected. The finished rocket, without engine, weighs 20.25 ounces, and is still estimated to fly 400 feet on a 29 mm F15-4.

The material costs to print the parts was
561 gm (not counting the aborted nose cone print job) or ~half of the $15 spool of white PLA. The BT-80 body tube costs ~$5, plus the cost of the 29 mm engine mount, engine retainer, Kevlar, shock cord and parachute, or approximately $25 total. An almost identically sized
Maxi Honest John kit from Boyce Aerospace Hobbies costs $150. Obviously, I'm doing this as much for the experience of figuring out how to print large parts on my own and not just trying to save money. At this point, the gift of the 3D printer is a sunk cost so I'm just printing for consumable costs so this is a pretty cheap way to recreate a cool out-of-production rocket! Having the
large print surface of the Anycubic Kobra Max allows me to easily print this 12 inch tall nose cone, something I could never do with our local library's printer service.
Jan 23 update:
While working on another project I noticed a setting in OpenRocket that would automatically add an end cap to the nosecone so I don't have to figure out how to print and glue a hemisphere (above):
Adding that before exporting the nose cone as an .OBJ appears to work. I'll still have to drill a couple of holes but will test that the next time I print a nose cone for my next project!
--><-- I tried using "End capped" on a new project printed 1/24 but the result was the full nose cone was filled (15% infill), not just the 1.5 mm bottom cap I intended. Gave up on that attempt and restarted without an "End cap".
Feb. 8 update:
After reviewing simulations and checking the 3D printed object's weights I decided to
reprint most of the parts, going from 4 mm to 1.5 mm thickness to save weight. However, when I did that, the transition piece (the lower half of the monster nose cone) snapped because it was too thin where the Ogilvie shape joined with the straight portion that goes into the body tube. I reprinted that piece (only) at 2.5 mm. Each of these big prints took ~a day but I'm much happier with the final result and it doesn't feel as massive. After trimming the nose cone parts, I sanded the surfaces and glued them together using "Crazy" super glue (see above) then glued on a nose cone base I'd printed by upsizing
the base for the Gemini capsule that got me started with 3D printing. I sanded the engine mounts and did a test fit, including the smaller one designed to anchor inside the fin can.
 |
| Body tube and plastic parts sanded, and engine mount assembled |
Today (2/8) was a warm day (above 50) so, after filling the body tube spiral and sanding that, along with the exposed plastic surfaces, I went ahead and painted the whole rocket with Rust-Oleum Spruce Green enamel spray paint.
 |
| 3D Printed clone of Estes Maxi Brute Honest John ready for painting |
 |
| My 3D printed clone of the Estes Maxi Brute Honest John drying |
JimZ's site has a
scan of the original Estes decals for this rocket which I plan to use as a stencil for spray painting the "U.S. ARMY" logo on two sides to approximate the original look (and help make it easier to find if it lands in tall grass!). I still need to glue in the engine mount, attach a Kevlar shock cord and parachute and attach (and paint) launch lugs but it's starting to look like a real rocket! Stay tuned.
March 5th update:
I've tried printing the decals but "white" doesn't "print" on a sheet of white decal/photo paper, even with a green "background". Plan B: I printed
JimZ's decals on a sheet of cardstock and am slowly cutting out the U.S. ARMY letters to make a stencil so I can spray on the logo using white spray paint. I added a decal to my OpenRocket simulation (
using Gimp I created the decal with the Spruce Green color, #486450 and used the
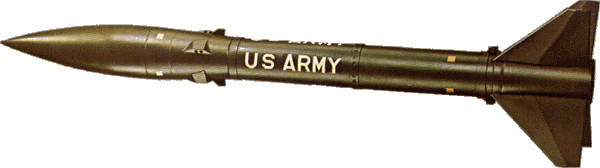
"Stencil Cargo Army" font I downloaded from 1001fonts.com) and here's what it should look like in flight:
 |
| OpenRocket simulation of my Maxi-Brute Honest John in flight |
May 7 update:
While exploring ways to place my GPS tracker inside the nose cones I came across a
better Honest John nose cone shared by Jamie Claye that includes a threaded base I can screw on to hold the GPS. I printed that and had to sand and repaint the body to fix some defects. After that dried a couple of days, I finally painted the "US Army" stencil on the body. I'm happy the way the finished rocket turned out!
My Maxi Brute Honest John joined my fleet on April 24th and is ready for launch!


Comments
Post a Comment