Honoring where my BAR experience started - Miss Riley
In the fall of 1999 my family and I went to see a movie, which hadn't been correctly advertised so we were offered another great new movie instead. That movie turned out to be "October Sky". At then end of the movie, a beautiful rocket was launched to honor their dying teacher, Miss Riley. Ky Michaelson, The Rocketman, who built the rocket(s) used in the movie, briefly sold 100 copies of a hobby version of the rocket. The kits were 55” tall, 2.64” Diameter with a 38mm motor mount and an Aluminum Billet Machined Nozzle, just like the ones used in the movie. Ky's kits were a 2/3rd Scale version of the original’s featured in the movie October Sky, exactly 20 years ago (at the time of the kit's release)!
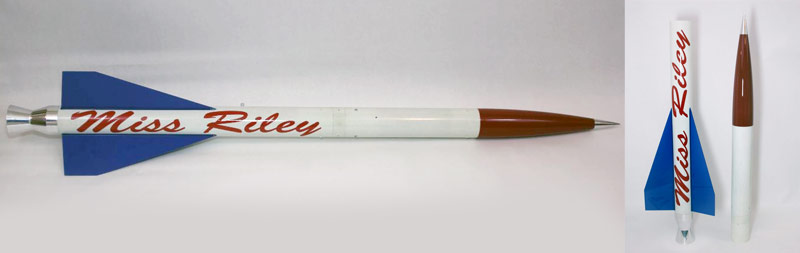 |
| The Rocketman's Miss Riley |
Ky provided some part specifications (his were fiberglass) and a RockSim simulation file (which I can open in OpenRocket) so I decided this would be a good 3D printing project.

Leveraging my recent work on 3D printing nose cones capable of holding my GPS tracking device I printed a 2.6" diameter nose cone designed by Jamie Clay on Printables with a screw in base using red PLA with a pause programmed to switch to silver for printing the tip, similar to the picture from The Rocketman's kit above. The nose cone is over 12" tall without the base.

Next, I exported Ky's fins from his RockSim file as an .OBJ file using OpenRocket, with the fins set to 2.5 mm depth and with fin tabs added so I can mount them through the wall. I printed those using blue PLA. These fins are huge, over 13 1/2" tall, and three of them filled my Anycubic Kobra Max's print bed!

I've 3D printed two centering rings, exported from OpenRocket, after resizing for a 29 mm engine mount instead of 38 mm. Lastly, I 3D printed the "De Laval nozzle", which played a big part in the movie, rendered in OpenRocket using dark grey PETG instead of PLA so it withstands the heat. I'll probably need to sand and spray paint the nozzle with metallic silver paint to achieve the desired effect but it should be a fun build.

The only remaining thing is to 3D print a tube cutting guide for the BT-80 (2.6") body tubes. Luckily, another user, Arogen67, shared his design on Printables.com so I should be able to print that this weekend. I only need to mock up the "Miss Riley" decal (below) and print it to decal sheets like I did for my SpaceX BFR, fill and sand the body, paint the rocket white and apply the decal. I'll use a Kevlar no-zipper shock cord attached to the engine mount as before.
 |
| OpenRocket simulation of my Miss Riley in flight |

OpenRocket estimates my Miss Riley should fly 700 feet on an Aerotech F67-6 White Lightning engine (which I already have), so I will definitely need my JLCR to control chute release until 300 feet so it doesn't drift to Kansas and use my GPS to track where it lands. I still need to weight the 3D printed parts and adjust the final estimate but OpenRocket allows me to simulate using PLA (100% infill) so I think the estimates should be pretty close.
April 15th update:
I finished my MINI Miss Riley and my Maxi Brute Honest John over the weekend so started work on the more complicated engine mount for my Miss Riley. After aligning the fins and measuring where to cut, it became obvious I would need to extend the engine mount, kind of like a "stuffer tube", so it extends past the fins. I found a bag of random sized Estes tube connectors and one of them fit on the outside of the engine tubes so I glued it in place with Titebond. Here's the test layout:

I used the BT-80 tube cutting guide to figure out where to cut the body tube:

The alignment guide was helpful but obviously not tall enough for this project, so I had to sketch with a pencil where to cut the do some free hand cutting as well as using the slot as a guide. This was the first time I'd ever tried something this big. Most kits come with body tubes that already have the appropriate size slits. It turned out okay, but I may need to fill some gaps with a clear putty and paint over when finished.

I glued the bottom centering ring to the nozzle for extra stability after allowing enough space for the threaded engine retainer to operate inside the nozzle. After more test fitting I realized I needed to 3D print a centering ring with slits to anchor the fins. I'll put it in the middle and use the solid centering ring (with holes drilled for Kevlar) at top to connect to the nose cone as I've done before.

I modified a 3D centering ring designed for a 3" rocket, with the hole resized for the 29 mm engine mount. It's printing now. Stay tuned.
April 29th update:
I've cut the slits, primed, sanded and painted the body tube. I printed my "Miss Riley" decal as before using Inkjet Waterslide Decal Paper, covered with a couple of coatings of clear paint, trimmed and applied it to the body. Now it's time to attach the fins. They're too big to use my Estes fin alignment tool, so I printed two fin alignment guides from PayloadBay.com, glued them to cardboard using Fast Grab Tacky Spray and cut out the shapes. I mixed up some JB Weld clear epoxy, applied it to the base of each fin, put them through the slits I'd cut in the body tube then used the printed fin alignment guides to hold them in the correct position while drying.

Another view of the forward alignment guide shows the decal in place:

I added a large rubber band around the rear nozzle to pull the fins to the body:

Later that night Miss Riley made her debut and joined the rest of my fleet! I placed the full size Miss Riley next to my MINI Miss Riley for comparison:


Comments
Post a Comment